Duck hunting comes at you from every direction before you ever step into a blind: gear lists, calling tutorials, species charts, federal regulations. Most of it is written for the DIY hunter who owns land or already knows where to access water. If your first experience is a guided hunt — and for many hunters, it should be — the relevant details are different. You need to know what the guide handles, what you bring, and what to expect from 4 AM to the drive home.
This is that breakdown, focused specifically on the guided experience.
What "Guided" Actually Means for a Duck Hunt
A guided waterfowl hunt is more equipment-intensive than almost any other guided outdoor experience. Your guide is not simply taking you to a good spot. Before you arrive, they have already scouted migration routes and feeding areas, set decoys — often 50 to 150 of them — in the dark, built or cleared a blind, and confirmed shooting light for your specific date and location.
When you walk in, the work is already done. Your job is to follow instructions, stay quiet during the birds' approach, and shoot when told. The guide calls the birds, reads the flock, tells you when to sit tight and when to stand. A veteran waterfowl guide runs an operation with the precision of someone who does this every single day of the season — because they do.
What You're Responsible For
Even on a fully guided hunt, there are items you must bring yourself and licenses that are your responsibility to obtain before you arrive. Never assume otherwise.
Licenses and Stamps
Federal and state waterfowl hunting requires more paperwork than most other hunts. In most states, you need all of the following:
- A valid state hunting license
- A state waterfowl or migratory bird stamp
- A Federal Migratory Bird Hunting and Conservation Stamp — the federal duck stamp, required for all hunters 16 and older
- A HIP (Harvest Information Program) registration in most states — free but mandatory, typically obtained when you buy your state hunting license
Check your state wildlife agency website for the exact combination required where you'll be hunting. Confirm which of these your guide provides — very few provide any of them, as licensing is almost always the hunter's responsibility. A conservation officer in the field will check them; have physical or digital copies accessible on your phone.
Your Shotgun and Shells
Most guides do not provide a shotgun. Bring your own 12-gauge or 20-gauge. Federal law prohibits lead shot for all waterfowl hunting in the United States — you must use non-toxic shot. Steel shot is the most common and least expensive option. A reliable starting load for ducks is 3-inch steel in No. 2 or No. 4 shot. For geese, step up to BBB or T-shot. Your guide may have a shell preference based on the hunt environment; ask before you buy.
If you do not own a shotgun and need to borrow or rent one, confirm this with your guide well in advance. Some operations have loaners. Most do not.
The Timeline of a Guided Duck Hunt Day
The single biggest adjustment for most first-timers is the hour. Waterfowl hunting is structured around shooting light — the legally defined time after sunrise when you're permitted to fire — and birds are most active in that first window of the morning. Everything works backward from there.
- 3:30–4:00 AM: Wake up. This is real. Eat something substantial before you go — most hunts run four to six hours and there's no stopping for breakfast once you're in the marsh.
- 4:00–5:00 AM: Travel to the staging area or parking lot your guide designates. Do not be late. The guide has been up for hours already and shooting light is not negotiable.
- 5:00–6:00 AM: Walk or boat to the blind in the dark. Move quietly. Headlamps are permitted but keep them pointed down and dimmed.
- 6:00–6:30 AM: Settle into the blind. Your guide will complete final setup and brief you on the plan: where to shoot, where not to shoot, the signal to stand, and safety instructions. Listen carefully — this briefing is short and covers everything you'll need in the next two hours.
- Shooting light: Varies by date and latitude; your guide knows the exact legal time. This is when the hunt begins.
- Morning flight: The first 45 to 90 minutes after shooting light are typically the most active. Birds that roosted overnight are moving to feed.
- Mid-morning: Action usually slows by 9 to 10 AM as birds have settled into feeding areas. Your guide will read conditions and decide whether to hold or wrap up.
- Hunt end: Most guided waterfowl hunts finish between 10 AM and noon. Confirm the expected end time when you book so you can plan travel accordingly.
What to Wear
Waterfowl hunting is cold, wet, and starts in the dark. Dress for all three, regardless of what the afternoon forecast shows.
- Base layer: Moisture-wicking synthetic or merino wool. Never cotton — it holds cold when wet and waterfowl environments are always wet.
- Mid layer: Fleece or an insulated jacket that allows free arm movement for mounting your shotgun.
- Outer layer: Waterproof, wind-resistant shell in camouflage or muted earth tones. Full camo is not always required inside a solid blind, but avoid white, bright colors, or anything reflective.
- Head and hands: A warm hat covering your ears and insulated gloves that allow trigger operation. Neoprene shooting gloves are available at most sporting goods stores and handle cold and wet equally well.
- Feet: Rubber-bottomed insulated boots for most hunts, or neoprene chest waders if your guide expects you to stand in water. Ask specifically what terrain you'll cross before you pack. Wrong footwear in a flooded timber hunt is a miserable four hours.
For hunts where birds will fly overhead at low altitude, face concealment matters more. Your guide will tell you whether a face mask or camo face paint is needed. A lightweight camo buff weighs nothing and covers the most visible part of your silhouette if you're unsure.
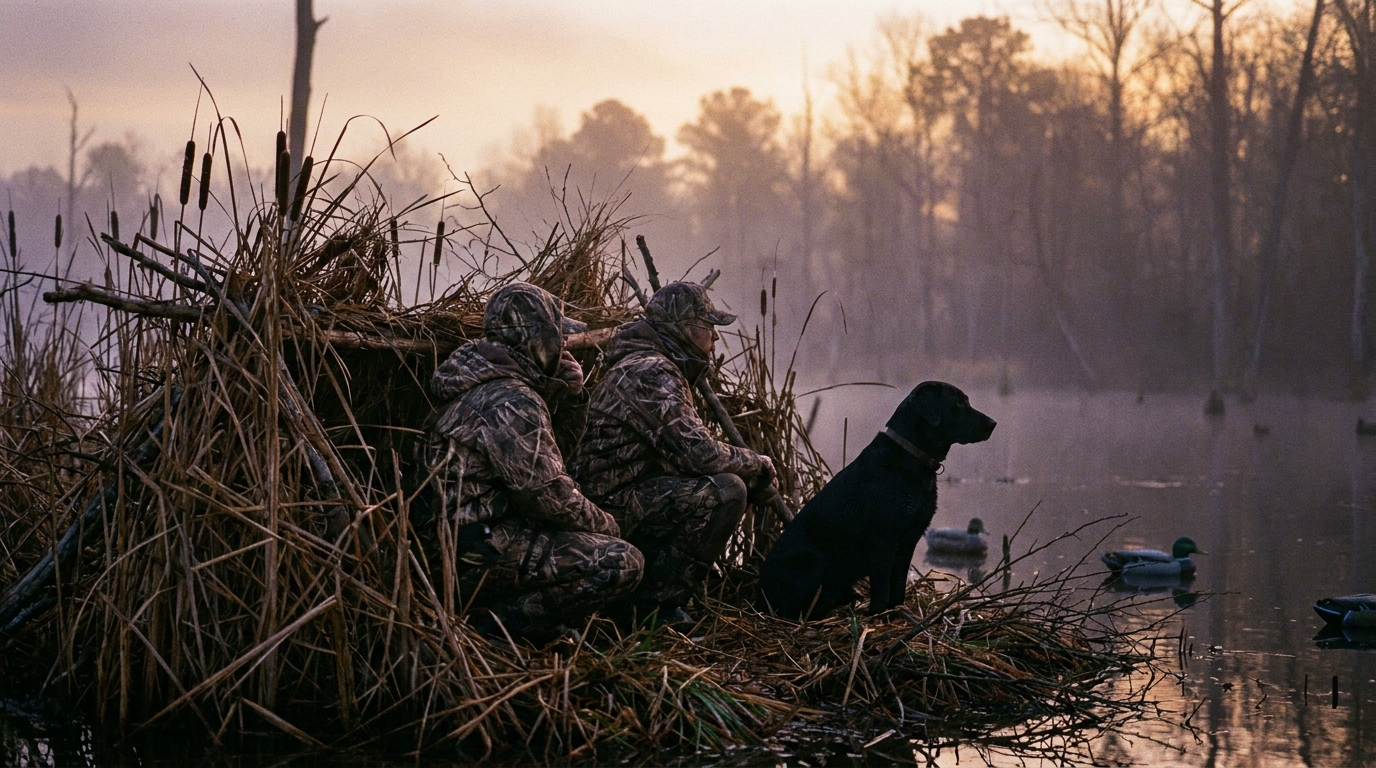
In the Blind: When Ducks Work the Spread
This is where first-timers most often cost the group birds — not out of carelessness, but excitement. When ducks are working a decoy spread, any movement can flare the flock from 80 yards out. A single turn of the head is enough to end the approach.
Stay seated and still until your guide gives the signal to rise. Keep your face angled down and your gun pointed safely at the ground in front of you. When the command comes — "take 'em," "get up," or whatever signal was covered in the pre-hunt briefing — stand, pick a single bird, and shoot. Do not swing through other hunters in the blind. Never point your muzzle anywhere but downrange at the birds.
After the shot, mark where birds fall by keeping your eyes on them until they hit the water or ground. Call out the position to help the retriever get there quickly. The dog will handle the water — your job is to mark and report the fall.
Habitat Types: What Changes by Location
Guided duck hunts take place in several distinct environments, and each has different character and practical requirements:
- Flooded timber: Standing water among flooded oaks or cypress trees — iconic for wood ducks and mallards in the mid-South and Delta. You will be standing in thigh-deep or chest-deep water, often in total darkness on the walk in. Chest waders are mandatory.
- Marsh and coastal wetlands: Common along the Gulf Coast, Chesapeake Bay, and Pacific flyways. Wide variety of species. Blinds may be layout boats, pit blinds, or brush-built structures along the bank.
- Field hunting: Primarily for geese and puddle ducks feeding in harvested grain fields. You may hunt from a pit blind dug into the field or layout blinds lying flat in the stubble. No waders needed, but wind exposure in an open field is significant — bring your warmest layers.
- River and reservoir hunting: Float-in or boat-based hunts along migration corridors, common for diving ducks — canvasbacks, bluebills, redheads — in northern states and the upper Midwest.
When you book, ask which habitat you'll be hunting and what specific footwear the guide recommends. That single question is often the most practical one you can ask before your first trip.
After the Hunt: Limits, Processing, and Tipping
Federal regulations set daily bag limits by species, and those limits adjust each season based on population surveys by the US Fish and Wildlife Service. Your guide will track the count and keep you legal — you don't need to memorize every species limit, but spending 30 minutes with a basic duck identification resource before the trip makes you a better and safer hunting partner.
Most guides will assist with field cleaning or connect you with a processor nearby. Some charge a separate processing fee; ask when you book so there's no surprise at the end of the morning.
For tipping, a common range for guided waterfowl hunts is 15 to 20 percent of the guide fee per hunter, given in cash at the end of the hunt. Adjust up for a guide who communicated thoroughly before the hunt, worked long hours on setup, or ran a particularly well-organized operation. Bird activity depends on migration timing and overnight weather — both entirely outside the guide's control. Base your tip on effort and professionalism, not bag count.
Finding the Right Waterfowl Guide
A reliable waterfowl guide holds the appropriate state guide or outfitter license, carries liability insurance, and communicates clearly before the hunt about exactly what you need to bring. When you reach out before booking, ask about the species variety realistic for your target window, blind quality and concealment, and whether a trained retriever is part of the operation. A well-trained dog changes the hunt significantly.
Read recent reviews with an eye toward communication and logistics, not just bird counts. A guide who sends a pre-hunt checklist, responds promptly to questions, and respects your time on arrival is one worth booking again.
Browse verified waterfowl and hunting guides by region at /guides — each listing shows current availability, what the operation includes, and what to expect before you commit to a date.